Navigation and Widgets
The primary navigation menu for the Hillsborough theme runs horizontally across the screen, just beneath your site title. The primary navigation menu is your users’ main resource for finding information and navigating throughout your site. The primary navigation menu is composed of menu items and sub-items.
In addition to the primary navigation menu, you can create menus and other content features in the sidebar and footer of your site through the use of widgets. Widgets are pre-formatted content blocks that can be easily added to designated areas of your site from the Customize menu or the Appearance>Widgets option on the dashboard menu.
To create your primary navigation menu:
- From your WordPress Dashboard, select Appearance from the menu on the lefthand side of the screen. Select Menus from the drop-down menu that appears.
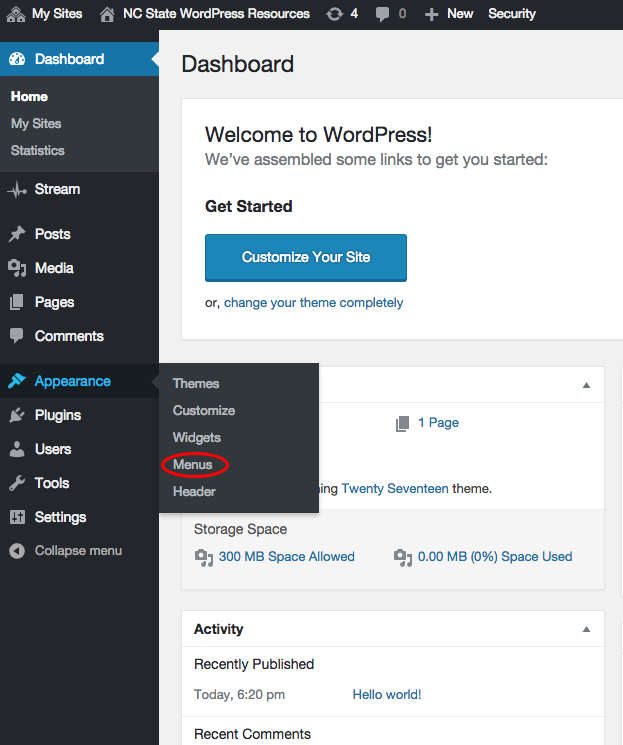 Select “Menu”
 - On the Menu screen, choose the pages you would like to appear in your navigation menu from the Pages list on the lefthand side of the screen. Click the Add to Menu button to add pages to the menu.
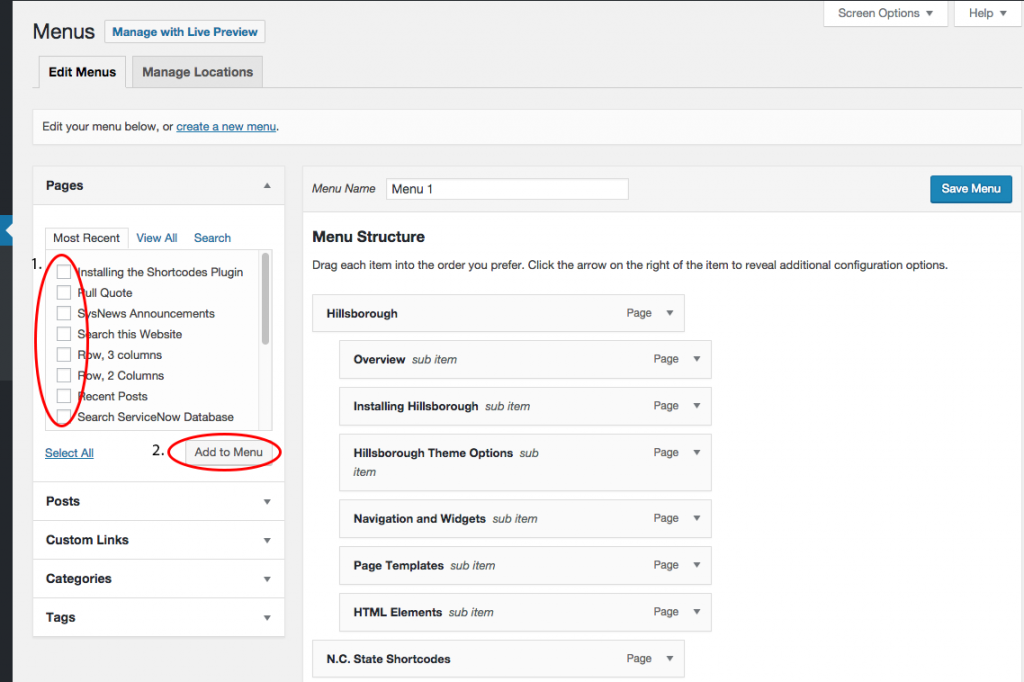 Select pages and add to menu.
 - The pages you selected will now appear in the Menu Structure window. You can drag each menu item into the order in which you would like it to appear in your navigation menu. To create a sub-menu beneath any menu item, drag the page you would like to appear in the sub menu over to the right. Once you have designated a page as a sub-menu item, the words sub-item will appear next to the page title. For more information about sub menus, see the section on sub menus below.
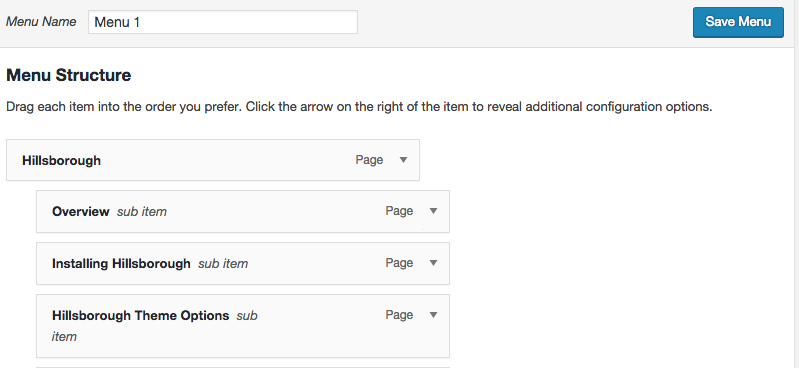 Menu Structure
 - When you have finished designing your menu, click the Save Menu button.
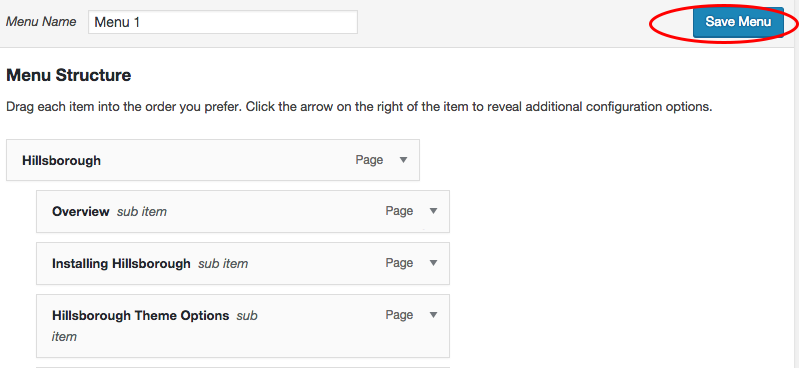 Save the Menu
 - Once you have saved your menu, you must assign it to a location. Click on the Manage Locations tab in the top lefthand corner of the menu panel
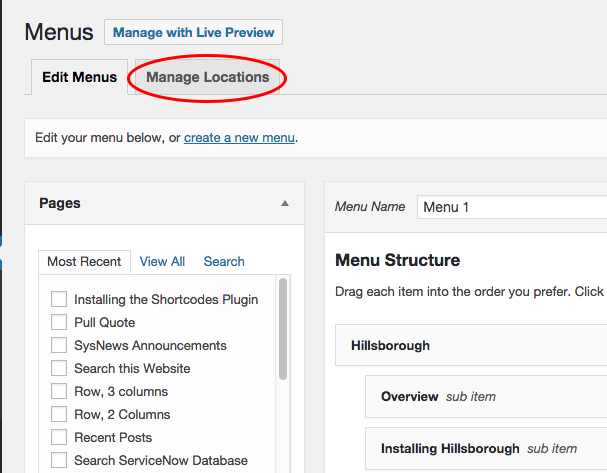 Select Manage Locations
 - Hillsborough provides only one menu location, Primary Menu. Select your menu from the drop-down list under Assigned Menu and click the Save Changes button.
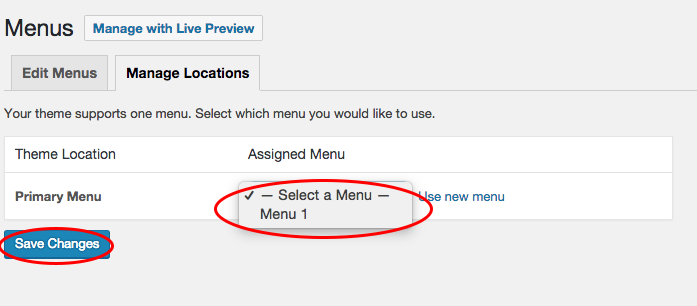 Select a menu location
Your primary navigation menu is now ready for action!
Creating a Sub-Menu
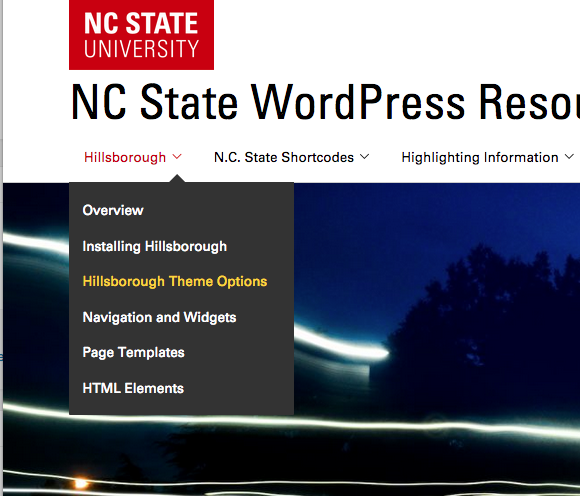
A submenu is a drop-down menu that appears beneath a menu item when a user clicks on an item in your navigation menu.
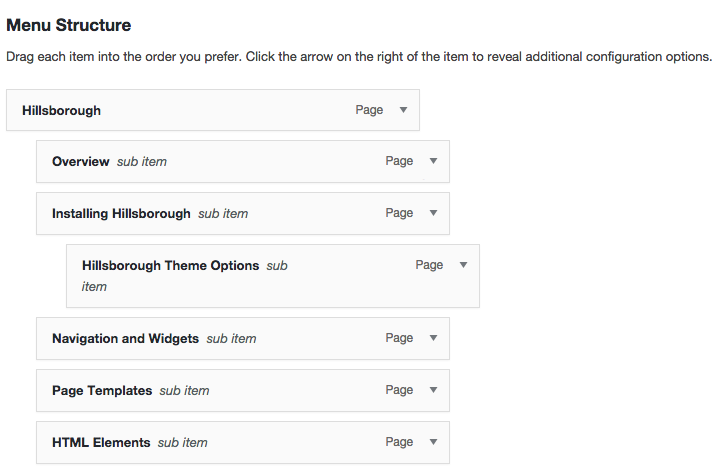
You can create a sub menu beneath any item in your navigation menu from the Appearance> Menus>Menu Structure screen. To create a sub-menu beneath any menu item, drag the page you would like to appear in the sub menu over to the right. Once you have designated a page as a sub-menu item, the words sub-item will appear next to the page title. It is also possible to create a sub-submenu beneath any sub-item by dragging the page below slightly further to the right.
A note about submenus
Due to accessibility concerns, once you create a sub menu beneath any menu item, that top level menu item will no longer be a clickable navigation option. It is therefore necessary to add the top level destination to the submenu again if you want to retain that menu item as a clickable navigation item. You can change the title of the duplicate menu item if you like.
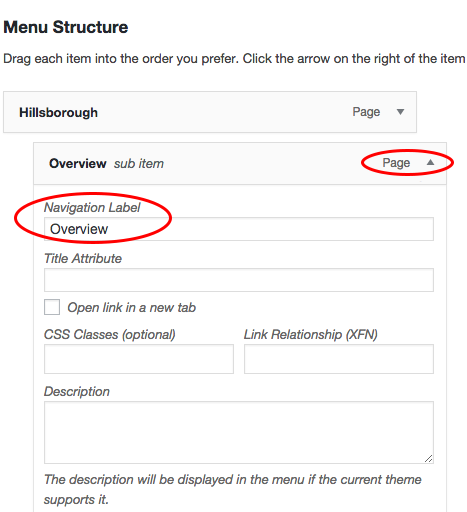
In the example below Overview has been added to the submenu to offer a navigation option for the top-level Hillsborough menu item, which is no longer active due to the submenu beneath it. Overview was created by adding a duplicate instance of Hillsborough to the menu and changing the title to Overview.

To change the title of a menu item
You can change the title of any item in your navigation menu from the Appearance> Menus>Menu Structure screen. For any item in your menu, click the arrow on the right of the item to reveal additional configuration options. To change the item’s title, edit the Navigation Label.
Widgets
Widgets are pre-formatted content blocks that can be added to the sidebars or footer of your site. You can use widgets to highlight certain pages or posts on your site, create a custom menu, add text or html to your pages and more.
Hillsborough offers six possible widget locations:
- Sidebar (displays on either the right or lefthand side of the page, depending on the page template)
- Blog Sidebar (displays on the righthand sidebar of blog posts)
- Footer: Left
- Footer: Center-Left
- Footer: Center-right
- Footer: Right
There are 15 pre-formatted widget options, including Text, which can be used to add custom text or html to any widget area.
To Add a Widget to Your Site:
- From your WordPress Dashboard, select Appearance from the menu on the lefthand side of the screen. Select Widgets from the drop-down menu that appears.
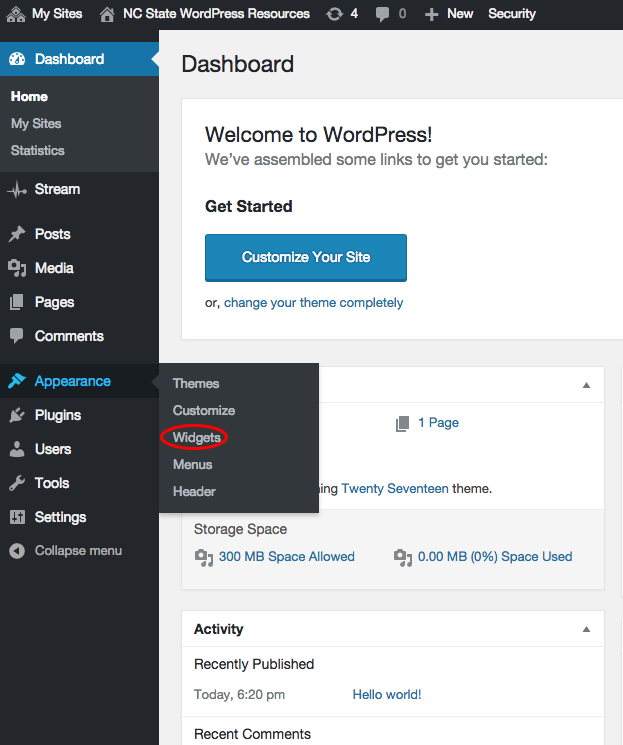 Select “Widgets”
 - Choose from the list of Available Widgets on the left. To activate a widget, drag it over to a sidebar or footer area in the list on the right.
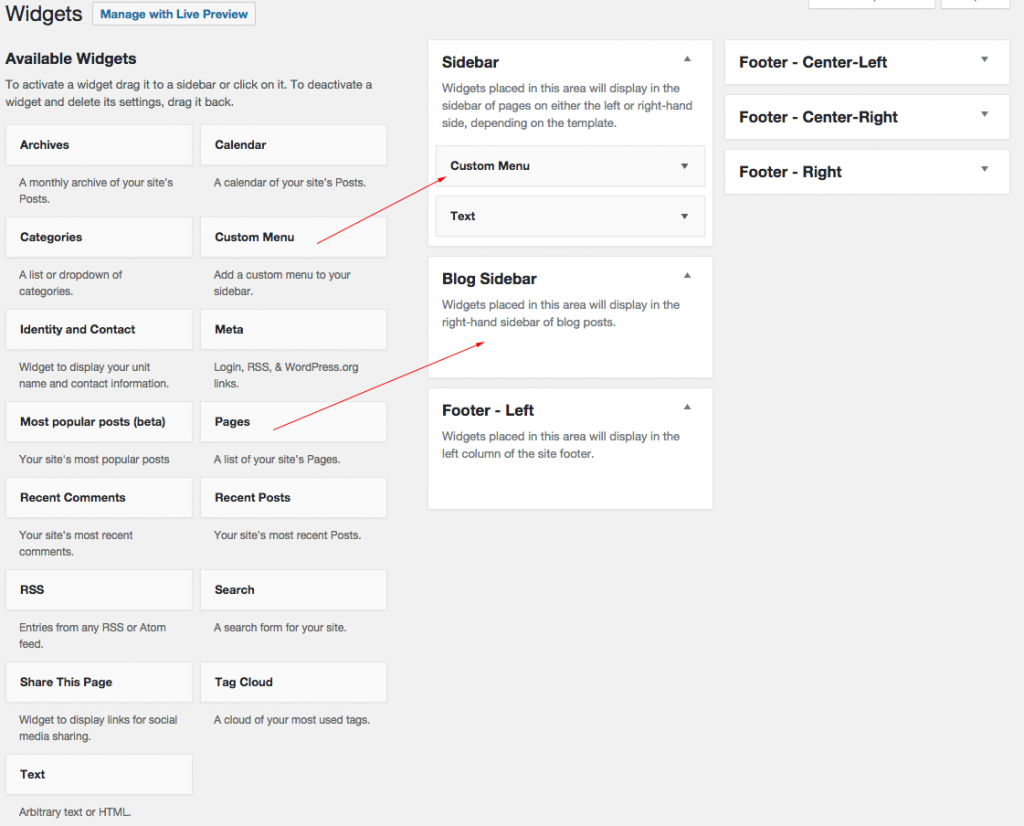 Drag widgets into a sidebar or footer area
To Create A Custom Sidebar Menu :
- First, create your menu on the Appearance>Menus>Edit Menus tab. Follow the instructions above for creating a primary navigation menu but do not assign the menu a location (skip step 6.)
- Go to Appearance>Widgets. Select Custom Menu from the available widgets and drag it into the Sidebar content area.
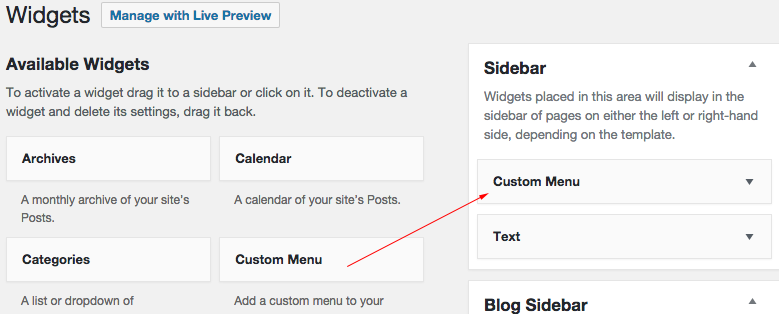 Drag the “Custom Menu” widget into the sidebar
 - Select the sidebar menu you created from the drop down list in the Custom Menu widget and click Save.
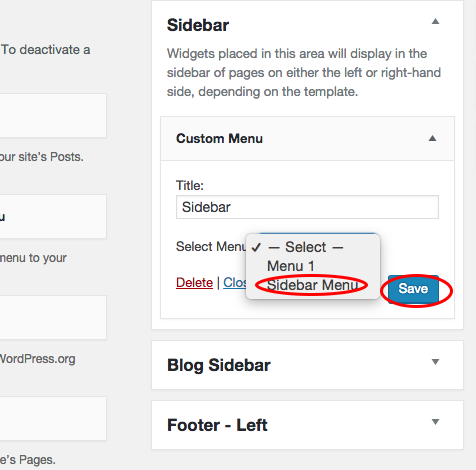 Select your sidebar menu
Your sidebar menu will now appear on any page that uses a sidebar template.